In a nutshell
- 🧶 Loops beat knots: the loop method spreads friction via the capstan effect, protects jackets, prevents kink memory, and releases fast.
- 🪤 How-to: coil with over–under, add a figure‑eight rubber band, wrap 2–3 times, then make a small trap loop; match bands (#16–#18 thin, silicone ties for thick leads).
- 🧪 Materials & safety: natural rubber grips but perishes; silicone resists heat and moisture; EPDM is a cheap middle ground; avoid hot bricks, replace fatigued bands, and pick latex‑free if needed.
- 🧳 Everyday wins: commuters, photographers, and home offices keep drawers tidy; travellers pack flat; try an always‑on anchor, a binder clip dock, or dual traps for long extension leads.
- 💡 Payoff: ultra‑low cost, reusable, pocket‑friendly control that boosts strain relief and turns cord chaos into neat, deployable coils.
We’ve all stared at that drawer: a snarl of chargers, earbuds, and mystery leads that somehow braid themselves overnight. The simplest cure may also be the cheapest. A humble elastic, applied cleverly, turns chaos into order. The rubber band trap uses small, controlled loops to grip, park, and release cables on cue. No adhesives. No bulky organisers. Just physics and consistency. Small, deliberate loops change the behaviour of long cords, stopping tangles before they start. What follows is a field-tested guide from desks, studios, and trains across Britain—pragmatic steps, material tips, and a few neat twists that keep cable clutter firmly at bay.
Why Loops Beat Knots for Cable Control
Knots are permanent in attitude, even when you manage to undo them. They bite into insulation, concentrate stress near connectors, and take time to tie. The loop method avoids all of that. You coil the lead in its natural lay, apply an elastic to create a light, even squeeze, then add a small “trap” loop that locks everything without crushing. The magic is friction shared across surface, not force jabbed into one point. Think of it as a gentle parking brake. The cable stays ready to deploy without that dreaded kink memory.
There’s science behind the simplicity. Wraps multiply holding power via the capstan effect, giving high grip from modest tension. That means a thin band can restrain a chunky charger if the loop count is right. Unlike zip ties, the restraint is adjustable and reusable. Unlike Velcro straps, it adds almost no bulk in a pocket. Release is instant: pull the trap, lift the coil, and you’re rolling. The result is fast, repeatable, and kind to cable jackets—especially crucial for delicate earbuds and braided leads.
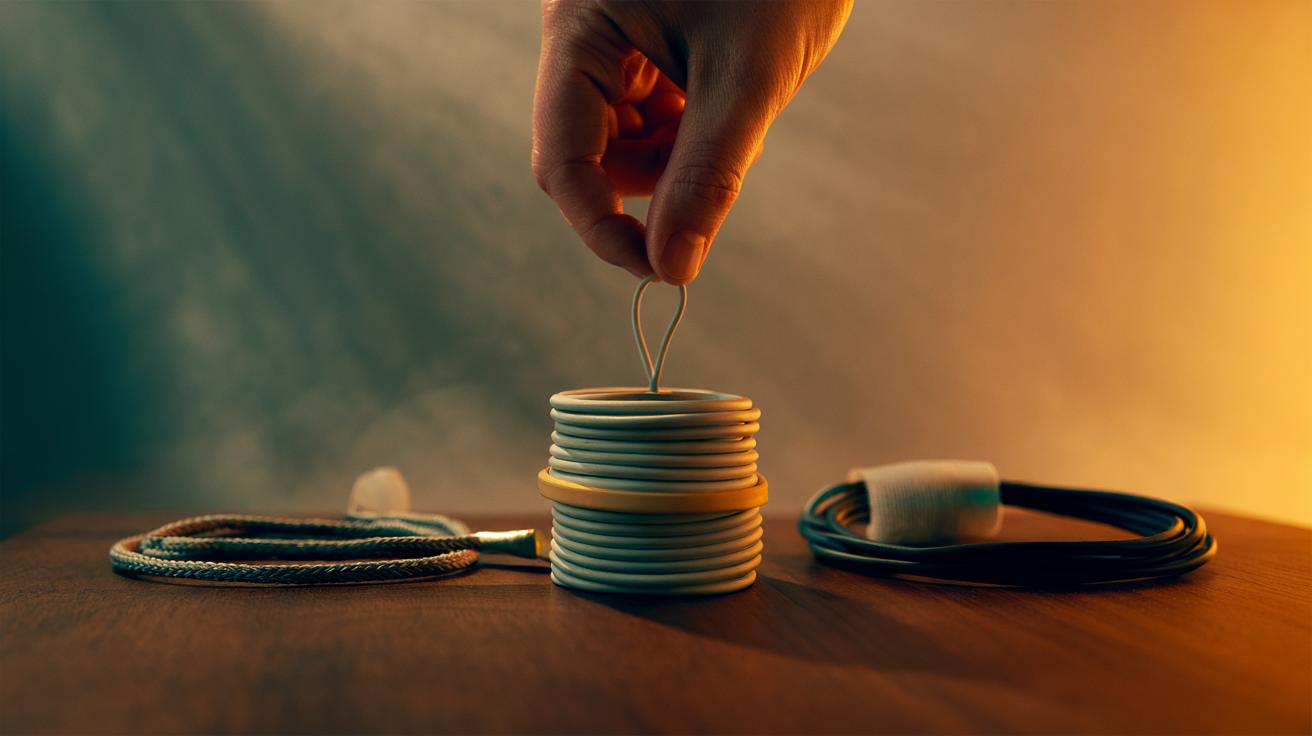
The Rubber Band Trap: Step-by-Step Method
First, coil the cable. Use the over–under technique so twists cancel and the cord naturally falls open later. Second, make an anchor: twist a rubber band into a figure-of-eight and slip one loop around the bundle’s belly, not the ends. Third, wrap the free loop around the coil two or three times to add grip. Fourth, create the trap: pull a small bight of band under the last wrap and snug it. This tiny loop is your on–off switch. Never cinch near a connector; keep restraint on the body of the bundle. The coil holds. It also releases in one tug.
Choose the right band for the job. Thin #16 or #18 elastics excel for earbuds and USB-C leads; thicker postal bands or silicone hair ties suit laptop bricks and appliance cords. Match diameter, not bravado. If you need more hold, add a wrap, not force. The quick reference below keeps it practical.
| Cable Type | Typical Diameter | Band Type/Size | Wrap Count | Notes |
|---|---|---|---|---|
| Earbuds / Thin leads | 2–3 mm | Thin #16–#18 | 2 wraps | Light tension; avoid mic module |
| Phone chargers (USB-C/Lightning) | 3–4 mm | Standard #19–#32 | 2–3 wraps | Anchor at mid-coil |
| Laptop adapters | 5–7 mm | Silicone hair tie | 2 wraps | Heat resistant, grippy |
| Extension leads | 7–10 mm | Wide postal band | 3 wraps | Use two bands for long runs |
Materials, Durability, and Safety
Not all elastics age equally. Natural rubber grips brilliantly but perishes under UV and heat; check for cracking and replace on sight. Silicone bands and hair ties cost a bit more yet handle temperature swings, sweat, and humidity with ease. EPDM postal bands sit in the middle: serviceable, cheap, decent in the cold. Store bands in a cool drawer and they’ll outlast the phone you’re charging. A pocket-sized tin of mixed sizes gives you options on the go and costs less than a coffee.
Mind compatibility and health. If latex is an issue, choose silicone. Keep bands off hot power bricks or radiant heaters; warm is fine, scorching is not. For audio and camera work, the soft squeeze provides excellent strain relief without imprinting jackets, especially on braided or fabric-sheathed cables. ESD-sensitive kit? The band lives on the coil, not the device, so risk is negligible. Replace fatigued bands early; prevention beats a snapped elastic and a spilled coil.
Everyday Use Cases and Neat Variations
Commuters clip earbuds to a bag loop with the trap facing out for one-handed release. Photographers stage sync leads by lens in tidy coils that deploy silently. Home offices gain instant order as chargers, HDMI jumpers, and USB hubs park neatly in drawers without tangling. Travellers love the low profile: three wrapped leads disappear into a passport pouch. Colour-code by device—blue for audio, red for power—and write short labels on paper tags under the band. A two-second loop beats a five-minute untangle, every single day.
Variations are simple and clever. Create an “always-on” anchor by leaving a small band semi-permanently around the cable, sliding it down to park the coil and back to release. Pair a band with a binder clip fixed to a desk edge: the clip becomes a dock, the band the latch. For longer extension leads, use two traps—one mid-coil, one tail—to stop the creeping slip that gravity encourages. A tiny anchoring loop also tames coiled guitar cables without imprinting the spiral. Small tweaks, big impact.
The rubber band trap is modest, almost invisible, yet transformative. It trades brute force for tactility, spreads pressure, and respects the cable’s natural lay. It’s budget friendly, repairable, and endlessly adaptable to new gadgets and old power leads alike. Once you feel how neatly a coil releases and rewinds, it’s hard to go back to knots and bulk straps. The technique rewards habit more than hardware, which is oddly liberating. So, which cords in your life will you loop, trap, and finally tame today—and what clever variation will you try first?
Did you like it?4.5/5 (22)