In a nutshell
- ✨ White chalk delivers instant optical brightening for dingy grout, as ultra-fine calcium carbonate particles adsorb light films and boost reflectivity for a cleaner look in minutes.
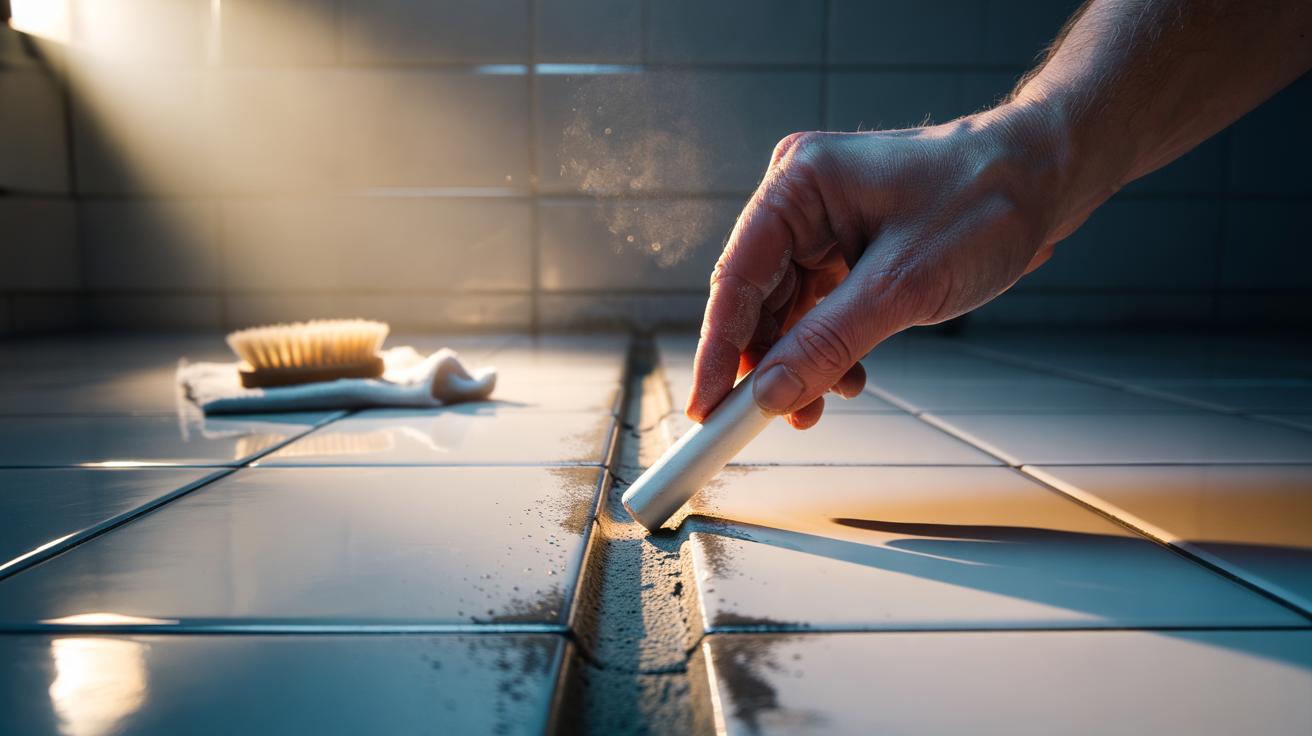
- 🧰 Quick method: work on dry grout, use plain white school chalk, dust lightly along lines, then buff with a soft brush and wipe tiles; repeat on stubborn spots for a fast, cosmetic refresh.
- ⚠️ Limits and safety: it’s a temporary uplift, not a fix for mould, rust, or deep stains; avoid coloured/waxy chalk, test on natural stone, and skip fully sealed or epoxy grout.
- 📈 Best use case: maintain cement-based grout between deep cleans, paired with ventilation, squeegeeing, and optional breathable grout sealer to keep lines brighter for longer.
- 📊 Alternatives at a glance: oxygen bleach for organic stains, baking soda paste for mild abrasion, and grout pens for purely cosmetic repainting—each with distinct time, cost, and care notes.
The quickest way to make a tired bathroom look crisp again isn’t a fancy cleaner or a full regrout. It’s a stick of white chalk. Rubbed along dingy lines, the fine powder clings to grime, evens out shade, and boosts reflectivity so the whole floor looks fresher. It’s cheap, low-risk, and oddly satisfying. A minute of gentle rubbing can lift the apparent colour of grout dramatically, buying you weeks before a deep clean is necessary. This isn’t magic. It’s physics and optics working with the porous nature of cementitious grout, and it’s a nifty stopgap for renters and homeowners alike who want results now, not after a weekend of scrubbing.
Why Chalk Works on Grout
Grout is full of micro-pores that trap soaps, oils, and daily dust. That texture darkens the lines, producing the familiar grey halo between otherwise bright tiles. A swipe of chalk — mostly calcium carbonate — behaves in three helpful ways. First, the ultra-fine particles lightly adsorb surface oils and soap films, loosening them for an easy brush-off. Second, the powder acts as a very gentle abrasive, knocking back the top layer of filmy deposits without gouging the grout. Third, it settles into microscopic pits and shadows, increasing light scatter and making the line look cleaner and whiter.
Think of it as an instant “optical brightening” for grout: you’re improving reflectance while quietly lifting the lightest soil from the topmost layer. The process is dry, so it sidesteps the streaks that can follow a wet clean on textured tiles. There’s a wicking effect too; contact plus friction helps the chalk dust pull out loose grime from the pores, a home-friendly nod to capillary action. Crucially, it’s gentle. On standard cement grout, you get visible uplift without harsh chemicals or long dwell times.
There’s a caveat. Chalk is a cosmetic quick fix for mild dinginess, not a cure for mould, rust, or deep-set tannins. Still, used between deep cleans, it keeps lines brighter, longer, and delays heavy-duty interventions.
Step-By-Step: A Two-Minute Chalk Refresh
Start with basic prep. Sweep or vacuum to remove grit that could scratch, then wipe the tiles so loose dust won’t smear. Dry thoroughly; damp grout clumps chalk. Always work on dry grout for maximum pickup and the best optical brightening. Choose plain white school chalk, not coloured, and avoid waxy art sticks — you want friable, powdery chalk that transfers easily.
Hold the chalk at a shallow angle and run it along the grout line in short strokes. Press lightly; you’re dusting, not carving. Let the powder sit for 30–60 seconds, then buff with a soft brush or an old toothbrush, following the line to push particles into micro-pores while lifting residue from the surface. Wipe tiles with a dry microfiber to remove haze. For stubborn spots, repeat once. If you’ve got a glossy tile that shows powder, a barely damp cloth will finish the job.
Seal the win by keeping moisture low for an hour — it helps the cosmetic effect last. If you plan to deep clean later, chalk won’t interfere; it brushes out. Tip: test first on a discreet area, especially on polished stone or epoxy grout. On marble or limestone, go feather-light, as both chalk and stone share a calcium carbonate base and too much friction can dull a high polish.
What Chalk Can and Cannot Do
Chalk excels at instant visual refresh. It makes light soils look lighter and restores crisp grout delineation. It will not neutralise mould, lift rust, or erase dye stains baked into the matrix. For those, you need targeted chemistry or more time. Still, as a bridge between proper cleans, chalk is hard to beat for speed, cost, and low odour. Pair it with good habits: squeegee after showers, ventilate to cut humidity, and consider a breathable grout sealer once lines are thoroughly cleaned and dried.
| Method | What It Does | Time | Cost | Safety Note |
|---|---|---|---|---|
| White Chalk | Adsorbs light films, boosts reflectivity | 1–3 minutes/m² | Very low | Use on dry grout; avoid coloured chalk |
| Oxygen Bleach | Oxidises organic stains/mildew | 10–30 minutes dwell | Low–medium | Ventilate; protect textiles |
| Baking Soda Paste | Mild abrasive lifting surface soil | 10–20 minutes | Low | Rinse well to avoid haze |
| Grout Pen | Paints a new white surface | Varies | Medium | Purely cosmetic; prep is key |
Reserve chalk for cement-based grout that’s a bit dull, not degraded. Skip it on fully sealed, non-porous, or epoxy grouts where powder won’t grab. On natural stone, test lightly; use minimal pressure and clean residue promptly. Think of chalk as your newsroom-ready trick: fast, visible, and surprisingly effective when time is tight.
Used smartly, white chalk turns lifeless grout into crisp lines in minutes, extending the period between wet cleans and keeping tiles photo-ready. It’s gentle, quiet, and cheap, and it respects the material beneath. Adapt the tactic: quick rub after the weekly vacuum, a buff before guests arrive, a top-up between seasonal deep cleans. Pair with good ventilation and the occasional oxygen bleach reset and you’ll stay ahead of the gloom. The secret is consistency, not force. Will you reach for chalk as a weekday refresh — and if so, where will you test its instant lift first: the kitchen splashback, the hallway, or the family bath?
Did you like it?4.3/5 (27)